January 28, 2025
How to Power Clean: Form, Muscles Worked, Benefits and More
The power clean is one of the high-intensity movements in Olympic weightlifting often performed by seasoned athletes, Olympic weightlifters, and regular gym attendees who strive to improve the whole-body explosive strength and power.
Despite the movement takes only several seconds to be performed, it requires enough skills and proper technique. If you include it in your training regimen, there are some neat gains in store for you. For martial artists, this exercise can tremendously improve punching and kicking power.
Grapplers can see a dramatic increase in takedown explosiveness. Additionally, the rate of force development from power cleans correlates to new personal records in absolute strength for other lifts, like squats and deadlifts.
This is what makes the power clean a key exercise for people who want to enhance their athletic performance and strength in general.
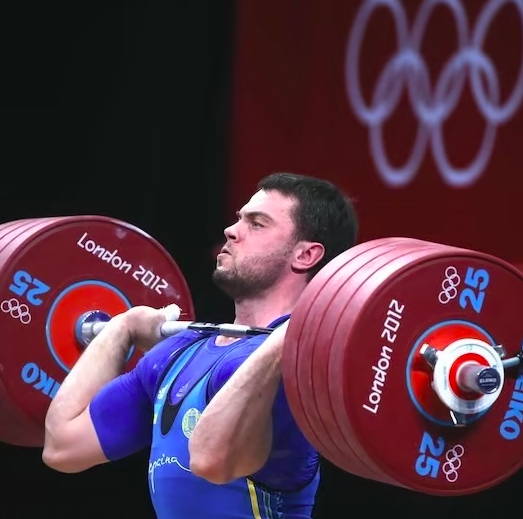
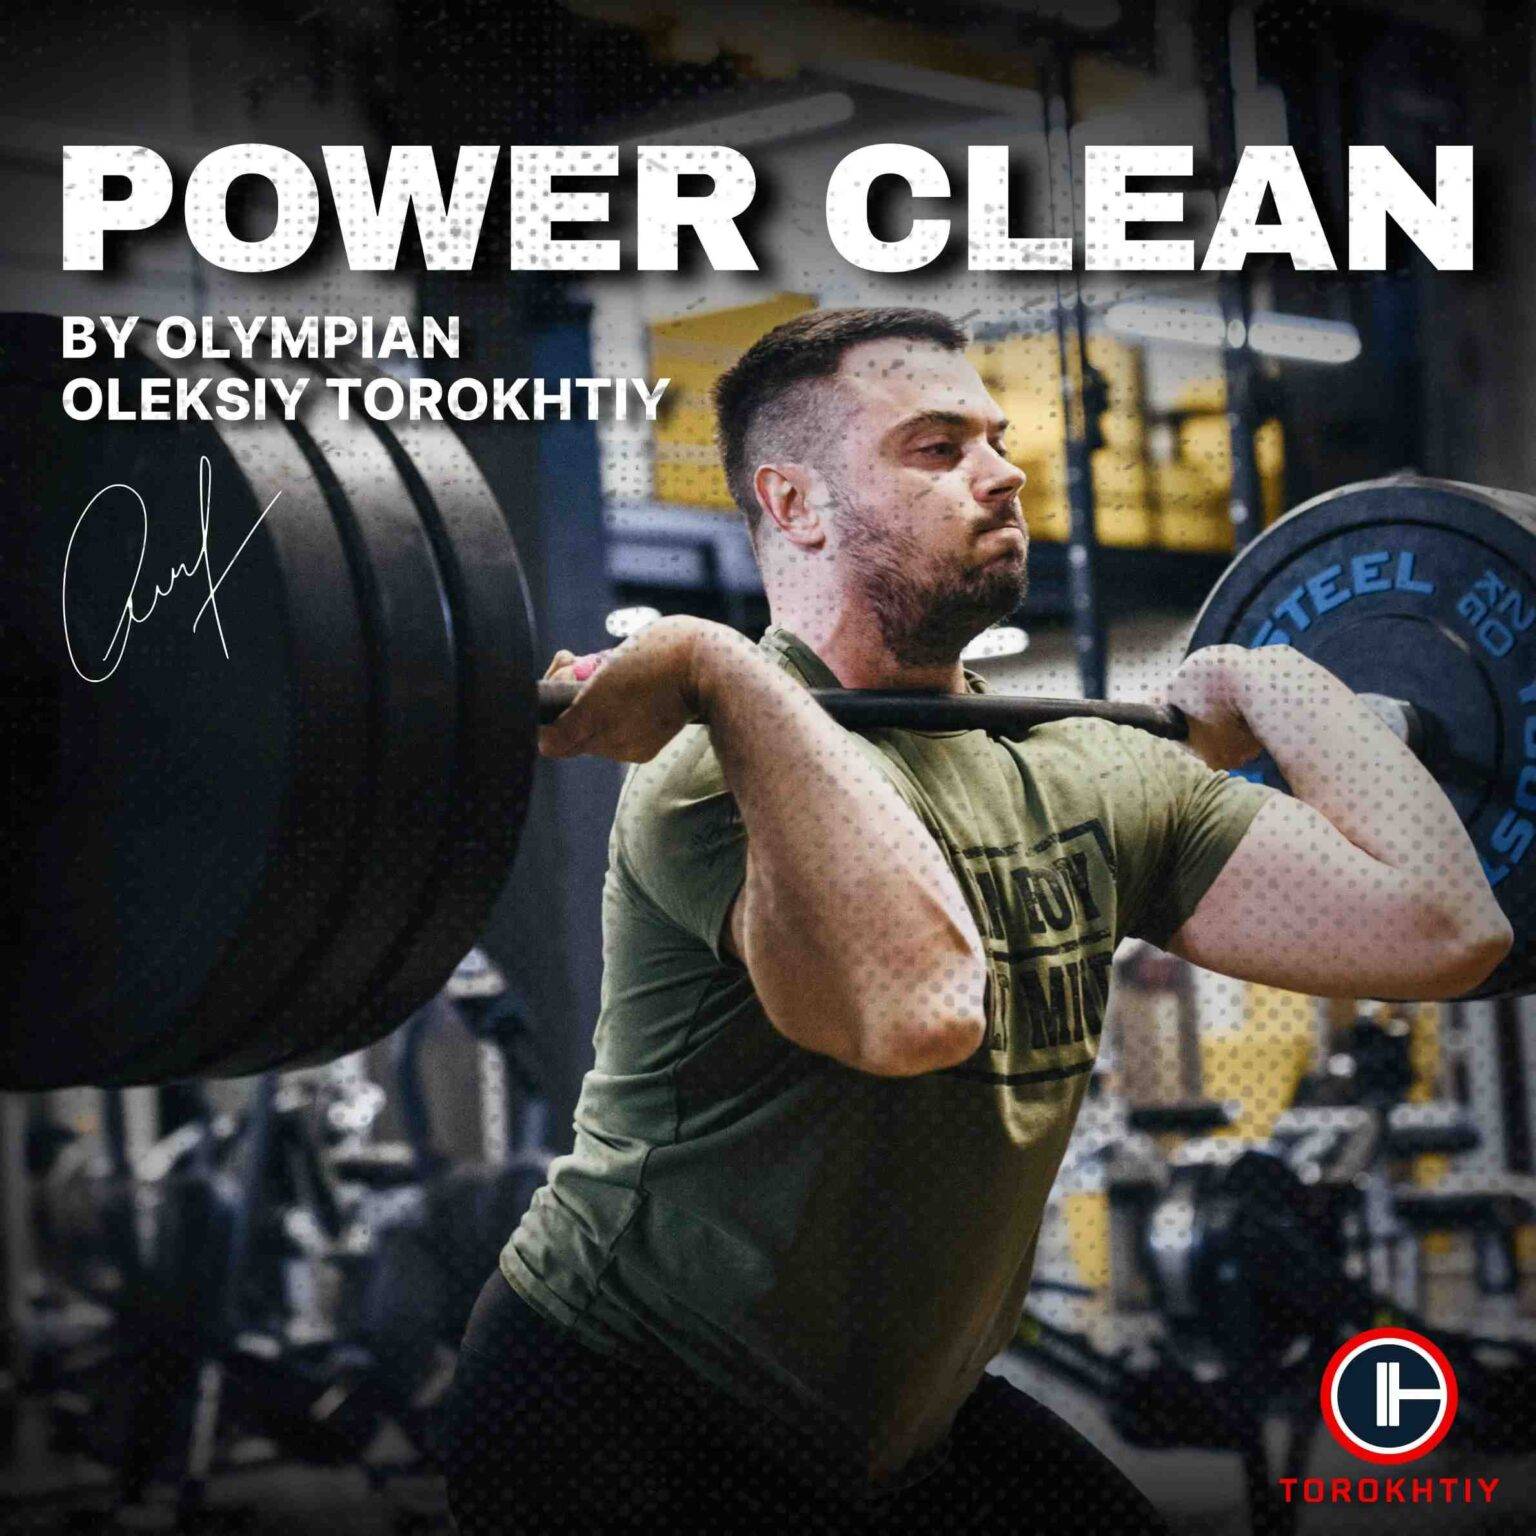
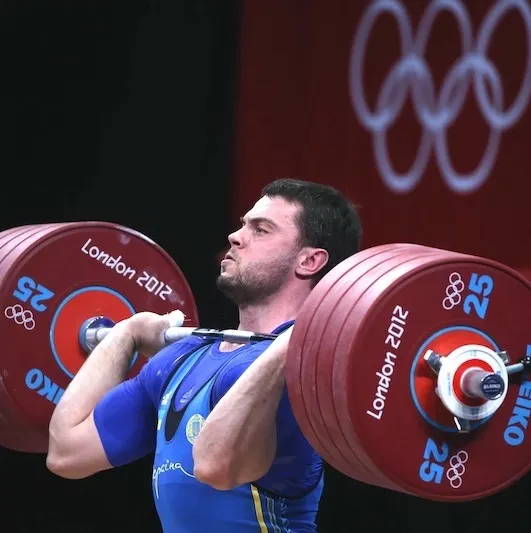
What is a power clean? – The power clean is a weightlifting exercise. It involves lifting a barbell from the floor to the shoulders in a single explosive movement.

It starts in a low position with the barbell on the floor, gripping the bar with an overhand grip, and then explosively extending the legs and hips while pulling the bar upward. The lifter then quickly drops under the bar and catches it in a front rack position as high as possible with the elbows up and the bar resting on the front of the shoulders.
Thus, it’s crucial to learn each Power Clean phase correctly at the very beginning as it can be difficult to correct it later, and also start with light l1oads to get assured that you have the proper form and condition.
As a regular training exercise, a Power Clean is effective in developing explosiveness, improving body composition, and general coordination and mobility.
Helpful Video Demonstrations on How to Do Power Clean
Step-by-step Visual Guide (Time: 2 minutes)
Video Demonstration and Small Tips (Time: 1 minute)
The Main Muscles Used in Power Clean
The Power Clean exercise involves a number of muscle groups working together in a coordinated manner to perform the movement. The primary muscles targeted by the Power Clean include:
1. Glutes and Hamstrings
These are the main muscle groups responsible for extending the hips and generating power to lift the barbell off the floor.
2. Quadriceps
The quadriceps are also heavily involved in the initial phase of the lift, helping to extend the knees and generate force.
3. Lower Back
The muscles of the lower back play an important role in stabilizing the spine and keeping the torso in the correct position throughout the movement.
4. Trapezius
The trapezius muscles in the upper back and shoulders are involved in shrugging the shoulders and pulling the barbell upward during the lift.
5. Deltoids
The deltoids, or shoulder muscles, help to stabilize the shoulders and keep the barbell close to the body during the lift.
6. Forearms
The forearms play an important role in gripping the barbell and maintaining control throughout the movement.
This is a quick answer to the question of what muscles do power clean work.
How to Do a Power Clean – Phases and Technique
1. Start Position
- this width is enough to keep the arms straight while grabbing the bar with the knees out;
- this width is enough to comfortably switch the bar to the front rack position;
- in the pull, this width allows to hold the bar as close to the thigh as possible and maximize power in the explosion.

2. 1st Pull
- keep shoulders above the knees;
- control the center of gravity on the mid-foot;
- stay flat-footed up to the explosion;
- press the bar towards yourself by involving lateral back muscles.

3. 2nd Pull

4. Turnover

5. Catch Position

6. Recovery

5 Tips on Improving the Power Clean by Oleksiy Torokhtiy
1. Wrist Warm-Up
Warming up your wrists is important in the power clean to prepare them for the demands of receiving and stabilizing the barbell in the rack position. Flexible wrists allow for a smoother, safer transition of the bar to the shoulders.
2. Mechanics of Clean Turnover
3. Mid Thigh Clean Pull
4. Squat Clean
5. Simple Clean Progression
4 Power Clean Benefits
✅ Improved Explosiveness
✅ Increased Power Output
The Power Clean is a multi-joint exercise that involves a large number of muscle groups working together in a coordinated manner. This can help to increase overall power output and strength, which can be beneficial for improving performance in the snatch and clean and jerk.
✅ Enhanced Technique
The Power Clean can help to improve technique and form in Olympic weightlifting by reinforcing proper movement patterns and body mechanics. This can lead to improved performance and reduced risk of injury.
✅ Improved Grip Strength
The Power Clean can be an effective exercise for building muscle mass and increasing overall strength. This can be particularly beneficial for weightlifters who need to gain weight and build muscle to compete in higher weight classes.

Overall, the Power Clean is a highly effective exercise for Olympic weightlifters, and it can provide a number of benefits for improving performance in the sport. However, it is important to learn proper technique and form and to progress gradually in weight and intensity to avoid injury.
Try Our Programs To Achieve New Result
If you’d like to work more on your Clean and Power Clean, try one of our programs to improve your technique or gain new personal best.
Power Clean Training Program – 6-week training program, specially designed for athletes across different sports who aim to enhance their explosive strength and improve their performance.
Elevate Your Game with the POWER CLEAN Program!

🏋️♂️ Boost explosive strength in 6 weeks.
💪 Enhance performance across sports.
📆 Three intense sessions per week for 6 weeks.
🔥 Natural, functional movements for athletic peak.
🏅 Achieve new results in the POWER CLEAN
⏱ Quick results without long-term commitment.
Join today and dominate your sport! 💥💪
Olympic Clean Masterclass – to level up your technique and learn how to clean perfectly.
🚀 Elevate Your Clean Technique with the Clean Masterclass! 🏋️♂️
Ready to enhance your Clean skills? Clean Masterclass is your path to success!

What’s Inside:
✅ 20 Theoretical Lessons + 60 Video Tutorials
✅ 12 Practical Lessons + 45 Video Demonstrations
✅ 90 Drills, including 30 Pro Tips
✅ 120 pages of elite weightlifting expertise.
Why Choose Us:
🥇 Expert Guidance for Athletes of All Levels.
📖 Learn the “What” and “Why” Behind Every Move.
🧠 Backed by Science for Optimal Progress.
Ready to level up your Clean technique? Join the Clean Masterclass now! 💥💪
5 Power Clean Variations
There are several variations of the Power Clean that can be used to target different muscle groups or to modify the exercise for different fitness levels. Here are some of the most common Power Clean variations:
1. Hang Power Clean
This variation involves starting the lift from a standing position with the barbell held at hip level, rather than from the floor. This can be a useful variation for beginners who are still developing their technique and for athletes who want to focus on explosive hip extension.
2. Power Clean From Blocks
This variation involves starting the lift from a standing position with the barbell held at hip level, rather than from the floor. This can be a useful variation for beginners who are still developing their technique and for athletes who want to focus on explosive hip extension.
3. Power Clean + Front Squat
This variation involves performing a Power Clean followed immediately by a front squat, which can help to build lower body strength and stability.
4. Power Clean + Push Press
This variation involves performing a Power Clean followed immediately by a push press, which can help to develop explosive power in the upper body and to improve overall athleticism.
5. Power Clean + Jerk
This variation involves performing a Power Clean followed immediately by a split or power jerk, which is one of the two lifts in Olympic weightlifting. This can be a useful variation for athletes who want to improve their performance in weightlifting competitions.
Overall, there are many different variations of the Power Clean that can be used to target different muscle groups, to modify the exercise for different fitness levels, or to prepare for weightlifting competitions.
It is important to choose the right variation for your goals and to work with a qualified coach or trainer to learn proper technique and form.
As for power clean workout, you are most likely to come across the hang power clean there – such athletes are fond of it.
5 Power Clean Alternatives
If you’re looking for alternative exercises to the Power Clean, here are a few options that target similar muscle groups and can provide similar benefits:
1. Hang Clean
The Hang Clean is similar to the Power Clean but starts from a standing position with the barbell held at hip level. This variation can be a good alternative if you’re looking to improve turnover and hip explosiveness.
2. Deadlift
The Deadlift is a classic strength exercise that targets the glutes, hamstrings, and lower back, which are also worked during the Power Clean. This exercise is great for building overall strength and can be a good alternative if you’re looking for a simpler exercise.
3. Kettlebell Swing
The Kettlebell Swing is an explosive exercise that targets the same muscles as the Power Clean but uses a kettlebell instead of a barbell. This exercise is great for improving power and athleticism.
4. Box Jumps
Box Jumps are another explosive exercise that can improve power and athleticism. This exercise targets the quads, hamstrings, and glutes, which are also worked during the Power Clean.
5. Snatch
The Snatch is another Olympic weightlifting movement that is similar to the Power Clean but involves lifting the barbell overhead in one continuous motion. This exercise can be a good alternative if you’re looking to improve your performance in weightlifting competitions.
Overall, there are many exercises that can provide similar benefits to the Power Clean. It’s important to choose exercises that fit your fitness level, goals, and equipment availability.
8 Most Common Mistakes in Power Clean
The Power Clean is a complex and technical exercise that requires proper form and technique to be performed safely and effectively. Here are some common mistakes to avoid when performing the Power Clean:
❌ Tight Arms
If an athlete is too far from the bar (the projection isn’t on the mid-foot), they can’t make maximum effort in the pull and simply lose balance.
In order to avoid this mistake, don’t rush in the set-up. Get into the habit of checking all ‘controlling points’ in the starting position before every set:
- balance and bar projection on the mid-foot;
- shoulders above the knees;
- back arched;
- arms relaxed.
❌ Shrugs
❌ Double Knee Bent
❌ Not Using The Legs Enough
❌ Rounding The Back
❌ Not Using Proper Grip
❌ Failing To Explode With The Hips
❌ Allowing The Elbows To Drop

The Power Clean Programming
1. Warm-Up
2. Frequency
3. Sets and Reps
4. Weight Progression
5. Technique
6. Variations

Who Should Perform Power Clean?
1. Athletes
2. Weightlifters
3. Strength and Power Athletes
4. Fitness Enthusiasts

5. Rehabilitation Patients
Also read:
References:
- Injury Rates and Profiles of Elite Competitive Weightlifters // NCBI: https://www.ncbi.nlm.nih.gov/pmc/articles/PMC1322916/.
- Anterior shoulder instability in weight lifters // Journals: https://journals.sagepub.com/doi/epdf/10.1177/036354659302100419.
- The Clean Pull and Snatch Pull // Research Gate: https://www.researchgate.net/publication/271567467_The_Clean_Pull_and_Snatch_Pull.
- Grip Strength and Sports Performance in Competitive Master Weightlifters // NCBI: https://www.ncbi.nlm.nih.gov/pmc/articles/PMC9915202/.
- Developing explosive power: a comparison of technique and training // NCBI: https://pubmed.ncbi.nlm.nih.gov/11339494/.
- Resistance training to improve power and sports performance in adolescent athletes // JSAMS: https://www.jsams.org/article/S1440-2440(12)00035-7/fulltext.
- Effects of load increase on lower extremity kinetic and kinematic variables in the back squat exercise // NCBI: https://www.ncbi.nlm.nih.gov/pmc/articles/PMC10200205/.
- Effects of load increase on lower extremity kinetic and kinematic variables in the back squat exercise // NCBI: https://www.ncbi.nlm.nih.gov/pmc/articles/PMC10200205/.
- The Limitations of Anterior Knee Displacement during Different Barbell Squat Techniques: A Comprehensive Review // NCBI: https://www.ncbi.nlm.nih.gov/pmc/articles/PMC10143703/.
- Knee Joint Kinetics in Relation to Commonly Prescribed Squat Loads and Depths // NCBI: https://www.ncbi.nlm.nih.gov/pmc/articles/PMC4064719/.
- Lower extremity muscle functions during full squats // NCBI: https://pubmed.ncbi.nlm.nih.gov/19075302/.
- Photos are made by Torokhtiy Media team.
Why Trust Us?
The product testing process is described in more detail here.
Experience: 21 years
Best Results: Snatch – 200 kg,
C&J - 240 kg
My name is Oleksiy Torokhtiy. I am a professional athlete with 20 years of experience in Olympic weightlifting. I have won multiple European, and World titles and have taken part in two Olympic Games (Beijing 2008, London 2012).
After finishing my career, I have committed myself to coach, and as of 2022, I’ve hosted 200+ weightlifting seminars all over the globe. I’m the founder of an international sportswear and accessories brand, Warm Body Cold Mind (my motto), author, and creator of a series of training programs and eBooks.
If you have any questions/suggestions/any other inquiry, you can reach out to us via email - reviews@torokhtiy.com